> ## Documentation Index
> Fetch the complete documentation index at: https://docs.getcargo.ai/llms.txt
> Use this file to discover all available pages before exploring further.
# Using UI
> Learn what tools are, and how to build your first one.
## What are tools?
Tools are modular, reusable automation workflows that you can build once and deploy anywhere. They encapsulate repeatable actions—like finding stakeholders, extracting revenue data, or qualifying leads—so you can scale your GTM workflows without rebuilding logic from scratch.
Once published, tools can be:
* **Triggered in plays** to run as part of automated workflows
* **Leveraged by agents** to accomplish complex tasks
* **Deployed to MCP servers** for external integrations
* **Called via API** from your own applications
> The more you invest in your Cargo tools, the more efficient and robust your GTM systems become.
***
## Use cases
Here are some of the most popular ways Cargo customers use tools:
* **Lead qualification:** Automate the process of qualifying leads based on custom criteria and real-time data.
* **Custom data enrichment:** Pull key company metrics (like 2024 revenue) from multiple sources automatically.
* **Stakeholder discovery:** Find and surface the right contacts at target accounts.
* **Outreach automation:** Send emails or trigger other communications as part of a larger workflow.
* **CRM hygiene:** Detect and fix data quality issues like invalid emails or duplicate records.
***
## Step-by-step: Build your first tool
Follow these steps to create a tool that finds stakeholders at a company based on a prompt.
### Step 1: Create a new tool
1. Navigate to **Tools** in your Cargo workspace sidebar
2. Click **+ New Tool** in the top right corner
3. Give your tool a descriptive name (e.g., "Find stakeholders from a prompt")
4. You'll be taken to the tool editor canvas
### Step 2: Define your inputs
Every tool needs input data to work with. Click on the **Start** node to configure your inputs:
| Property | Description |
| ----------------- | ----------------------------------------------------------------------- |
| **Field name** | The identifier for this input (e.g., `company_domain`, `search_prompt`) |
| **Type** | Data type: `string`, `number`, `boolean`, `array`, or `object` |
| **Required** | Whether this field must be provided for the tool to execute |
| **Description** | Help text explaining what this field is for |
| **Default value** | Fallback value if none is provided (optional) |
Use `snake_case` for field names (e.g., `company_name` instead of
`companyName`) for consistency across your workspace.
### Step 3: Add nodes to build your workflow
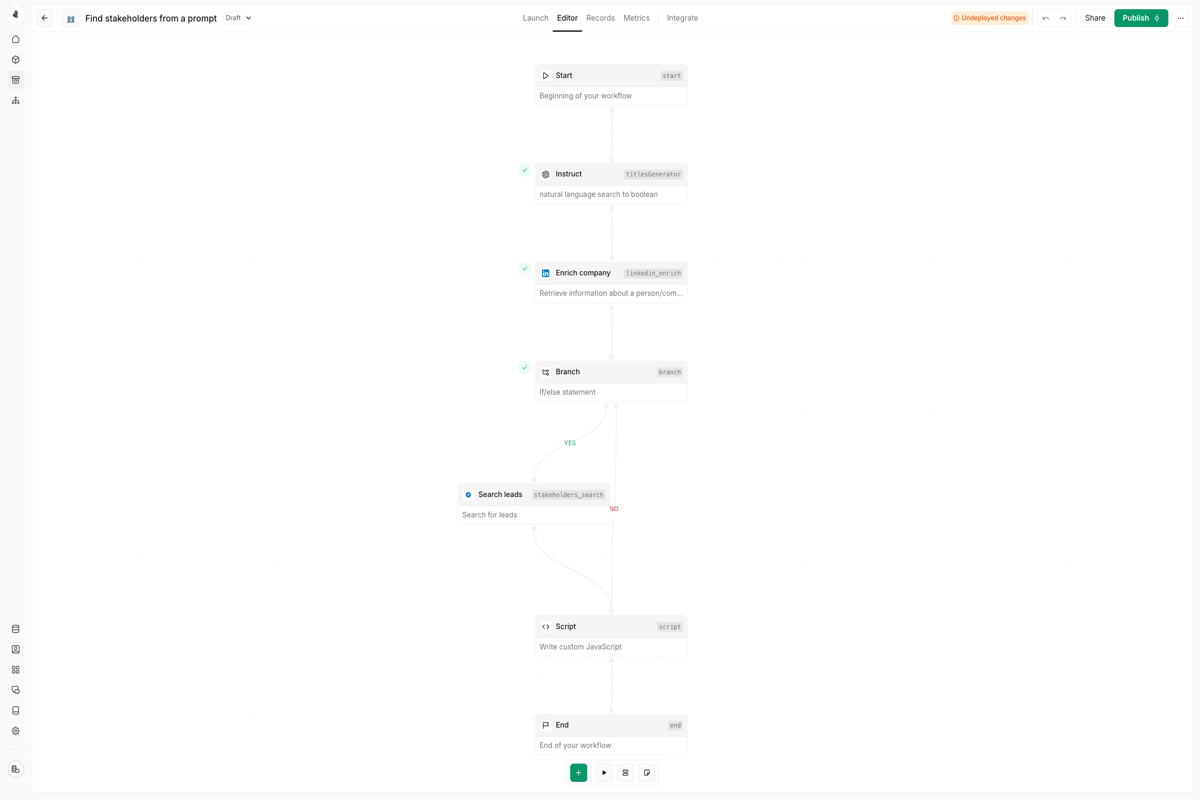
Click the **+** button to add nodes to your workflow. For this example, we'll build a stakeholder finder:
1. Add an **Instruct** node to convert natural language to structured criteria
2. Add an **Enrich company** node to gather company data
3. Add a **Branch** node to check if the enrichment succeeded
4. Add a **Search leads** node to find relevant contacts
5. Add a **Script** node to format the output
### Step 4: Connect your nodes
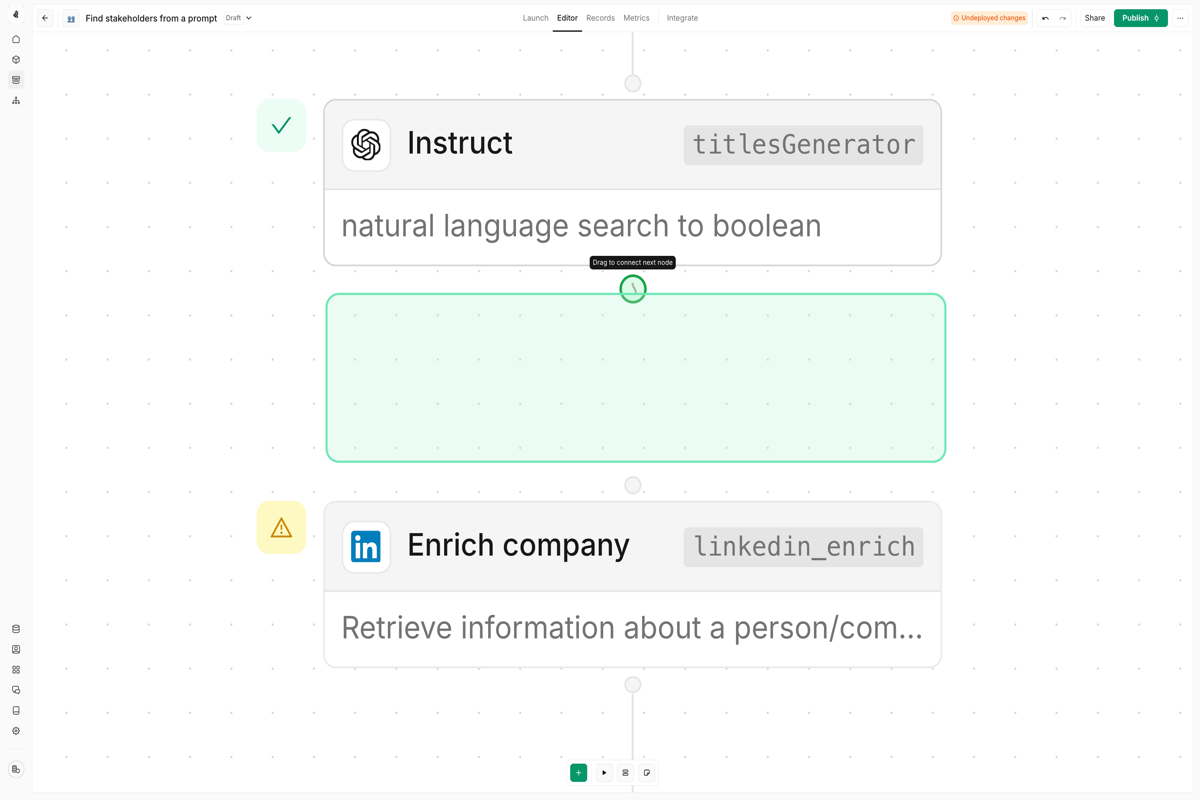
To connect nodes, click on the output handle of one node and drag it to the input handle of the next:
* Connections define how data flows through your tool
* Branch nodes have multiple outputs (YES/NO) for conditional logic
* A node's output can connect to multiple downstream nodes
### Step 5: Map data between nodes
Use expressions to pass data from one node to another. In any input field, reference outputs from previous nodes:
```
{{nodes.start.company_domain}}
{{nodes.enrich_company.employee_count}}
{{nodes.instruct.result}}
```
Check the [expressions cheatsheet](/reference/expressions-cheatsheet) for
all available syntax and functions.
### Step 6: Configure your output
Define what your tool returns by configuring the **End** node:
1. Click on the **End** node
2. Map the fields you want to return (e.g., stakeholder names, titles, LinkedIn URLs)
3. These outputs can be used by plays, agents, or external systems calling your tool
### Step 7: Test your tool
Before publishing, validate your tool works correctly:
1. Click the **Test** button in the bottom toolbar
2. Enter sample input data
3. Click **Run** to execute the tool
4. Inspect each node's output in the execution view
5. Fix any errors that appear
Test mode uses real integrations and may consume credits or modify external
systems. Use test data when possible.
### Step 8: Publish your tool
Once everything works, publish your tool to make it available:
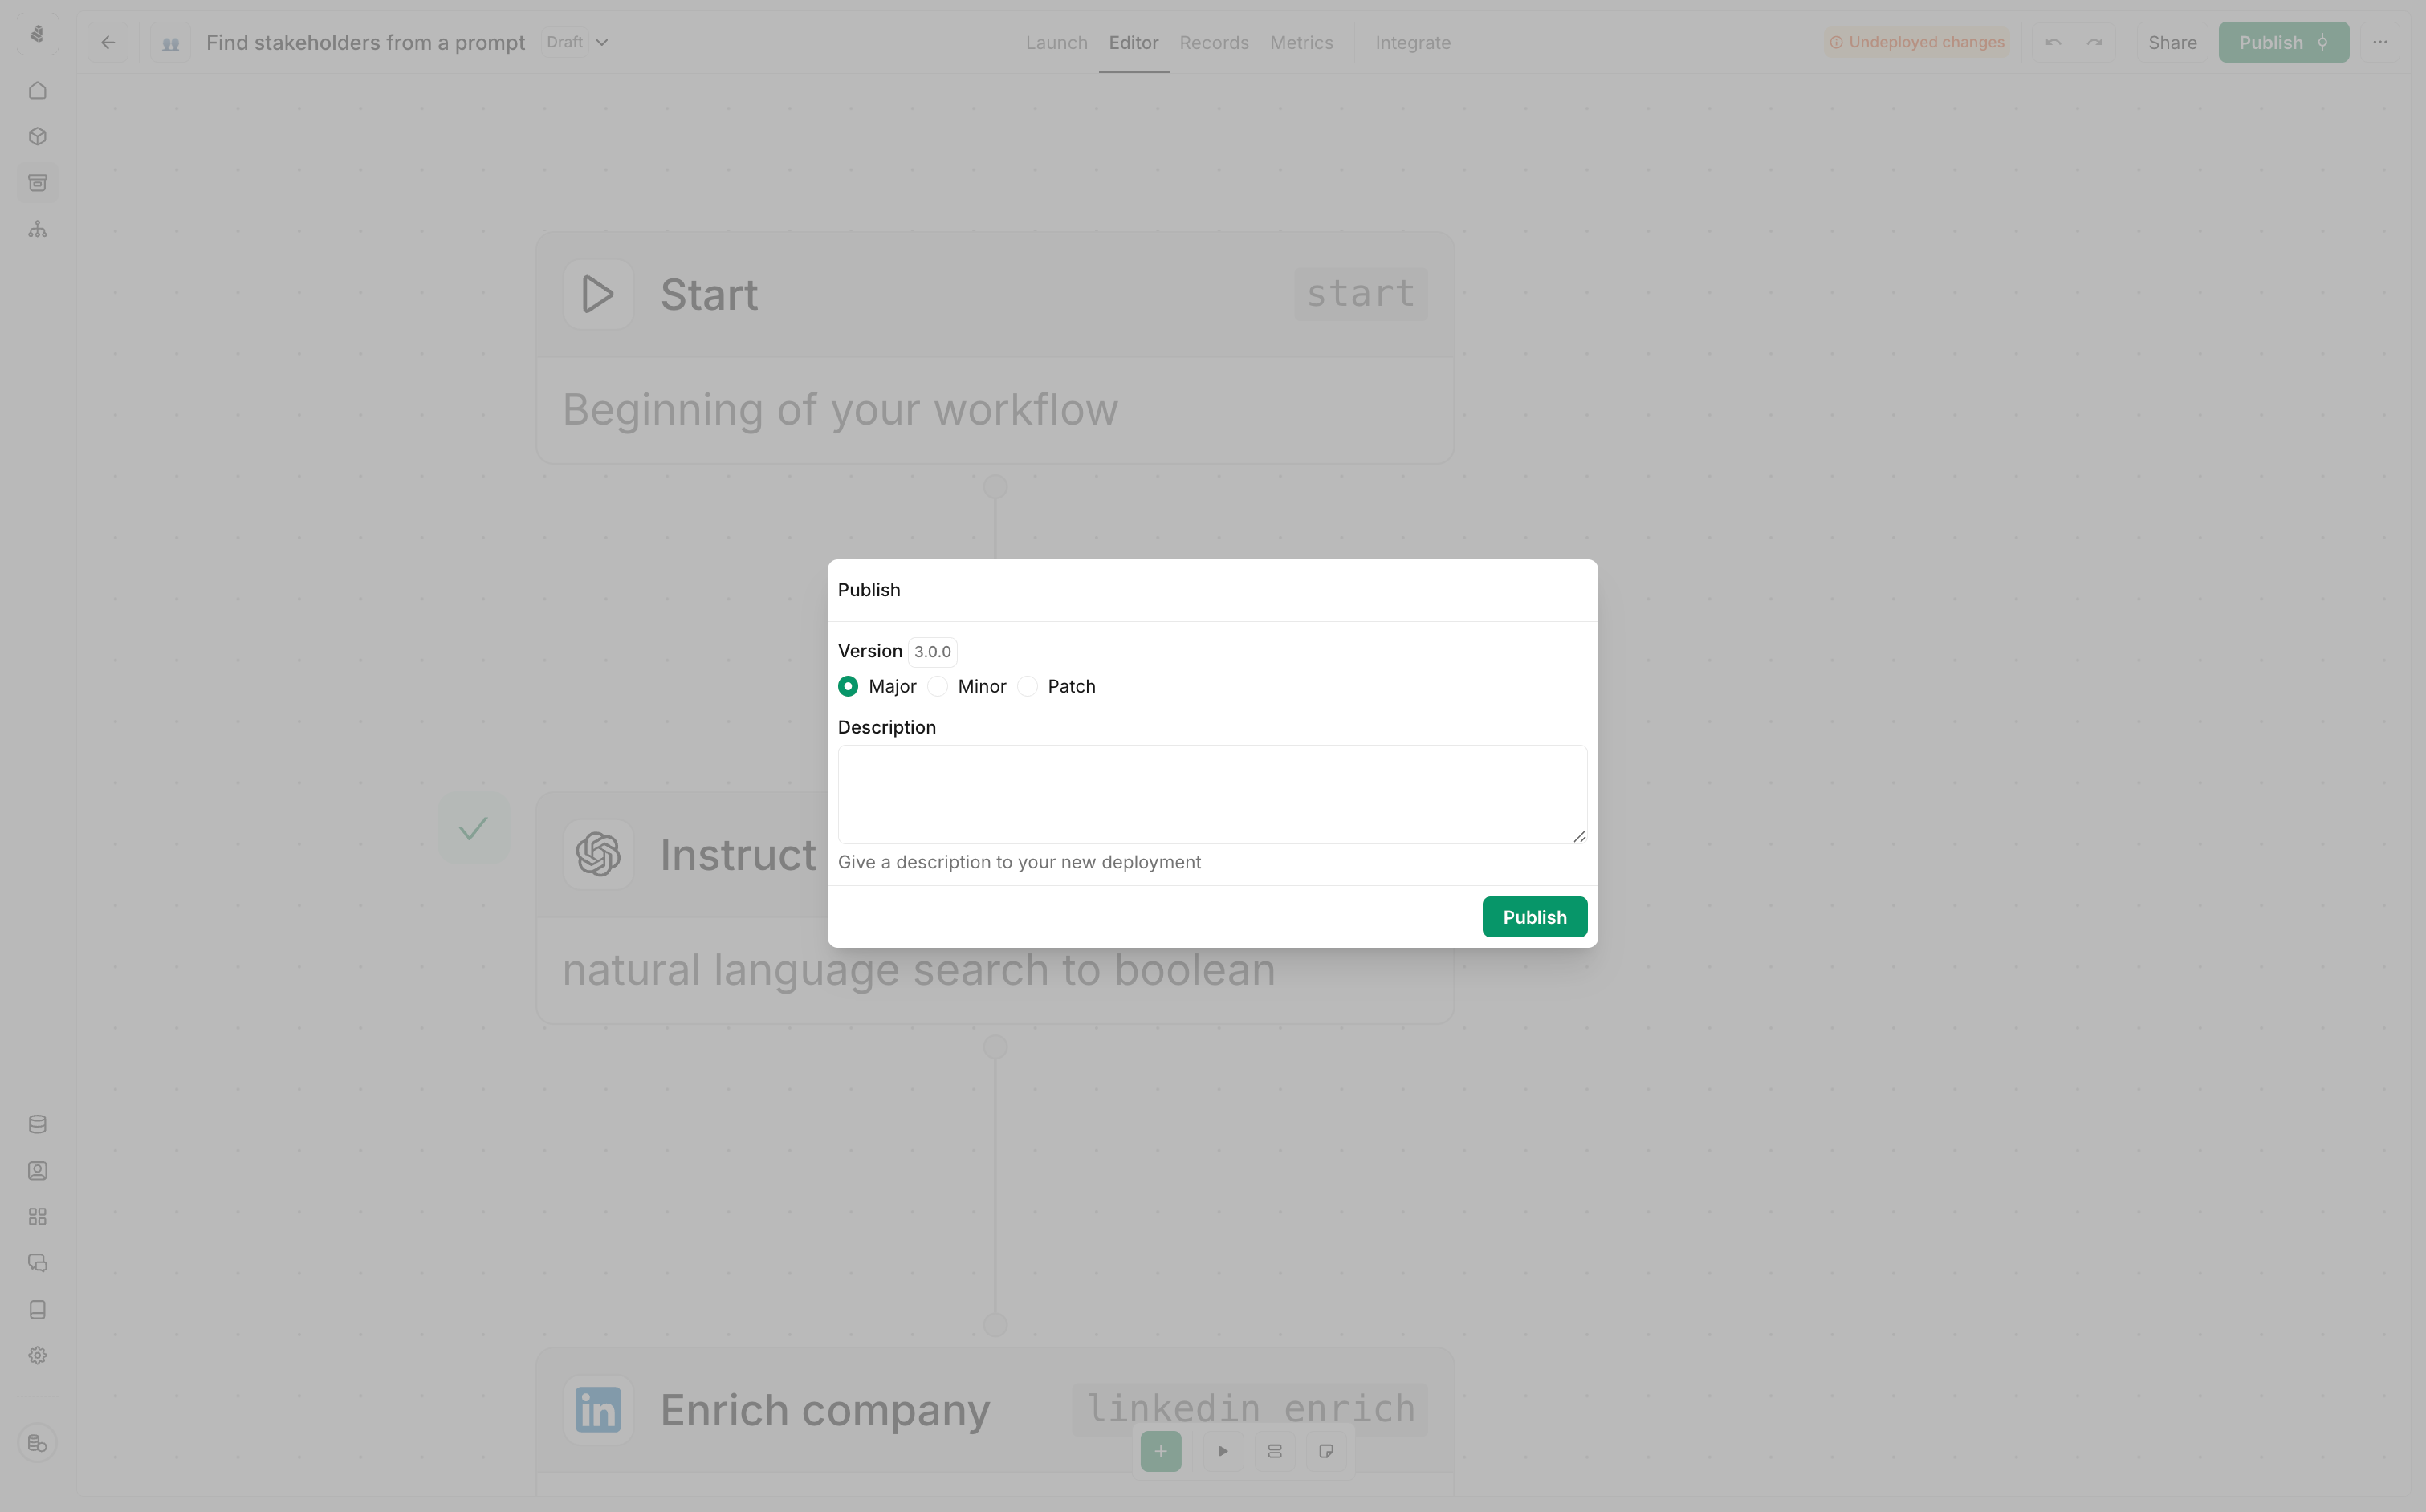
1. Click **Publish** in the top right corner
2. Choose a version type (Major, Minor, or Patch)
3. Add a description of your changes
4. Click **Publish** to deploy
Publishing creates a new version. Active plays and agents continue using the
version they were configured with until you explicitly update them.
***
## Managing versions
Tools support full version control so you can iterate safely:
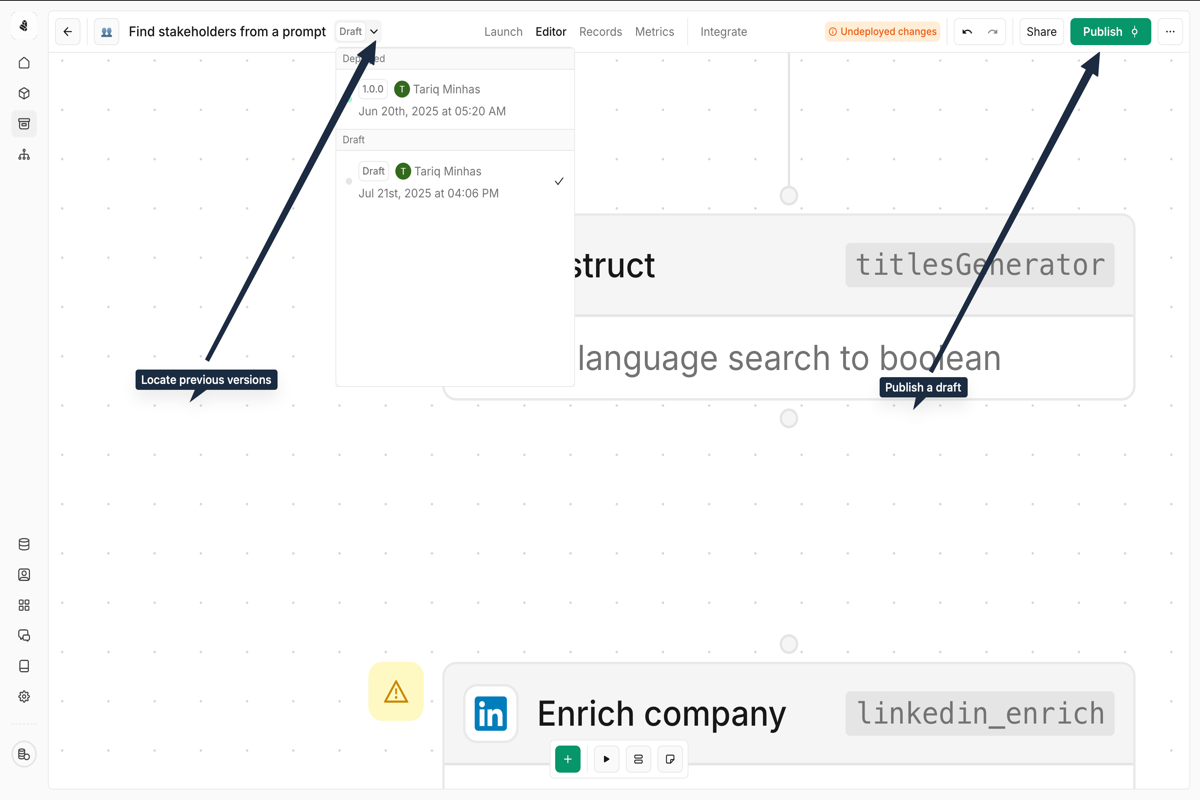
* **Drafts:** Changes are auto-saved as drafts until you publish
* **Version history:** Access previous versions from the dropdown menu
* **Rollback:** Revert to any previous version if needed
***
## Best practices
Rename nodes from defaults like "Branch 1" to something meaningful like
"Check if enterprise tier". Your future self will thank you.
Don't assume every node will succeed. Use Branch nodes to check for errors
and handle them gracefully—log failures, send notifications, or trigger
fallback logic.
Build tools that do one thing well rather than trying to handle every edge
case. You can always chain tools together in plays or let agents orchestrate
multiple tools.
Add descriptions to every input field. When someone else (or future you)
uses this tool, they'll know exactly what data to provide.
Don't just test the happy path. What happens with missing data? Invalid
formats? API rate limits? Test these scenarios before publishing.
***
## Next steps
Browse the 120+ actions in the editor's node palette — and how to list them
from the CLI.
Discover the different ways to trigger your tools.
Track executions, debug failures, and optimize your tools.
Trigger tools directly from Salesforce with custom buttons.
 ### Step 2: Define your inputs
Every tool needs input data to work with. Click on the **Start** node to configure your inputs:
| Property | Description |
| ----------------- | ----------------------------------------------------------------------- |
| **Field name** | The identifier for this input (e.g., `company_domain`, `search_prompt`) |
| **Type** | Data type: `string`, `number`, `boolean`, `array`, or `object` |
| **Required** | Whether this field must be provided for the tool to execute |
| **Description** | Help text explaining what this field is for |
| **Default value** | Fallback value if none is provided (optional) |
### Step 2: Define your inputs
Every tool needs input data to work with. Click on the **Start** node to configure your inputs:
| Property | Description |
| ----------------- | ----------------------------------------------------------------------- |
| **Field name** | The identifier for this input (e.g., `company_domain`, `search_prompt`) |
| **Type** | Data type: `string`, `number`, `boolean`, `array`, or `object` |
| **Required** | Whether this field must be provided for the tool to execute |
| **Description** | Help text explaining what this field is for |
| **Default value** | Fallback value if none is provided (optional) |
 ### Step 4: Connect your nodes
To connect nodes, click on the output handle of one node and drag it to the input handle of the next:
* Connections define how data flows through your tool
* Branch nodes have multiple outputs (YES/NO) for conditional logic
* A node's output can connect to multiple downstream nodes
### Step 5: Map data between nodes
Use expressions to pass data from one node to another. In any input field, reference outputs from previous nodes:
```
{{nodes.start.company_domain}}
{{nodes.enrich_company.employee_count}}
{{nodes.instruct.result}}
```
### Step 4: Connect your nodes
To connect nodes, click on the output handle of one node and drag it to the input handle of the next:
* Connections define how data flows through your tool
* Branch nodes have multiple outputs (YES/NO) for conditional logic
* A node's output can connect to multiple downstream nodes
### Step 5: Map data between nodes
Use expressions to pass data from one node to another. In any input field, reference outputs from previous nodes:
```
{{nodes.start.company_domain}}
{{nodes.enrich_company.employee_count}}
{{nodes.instruct.result}}
```
 1. Click **Publish** in the top right corner
2. Choose a version type (Major, Minor, or Patch)
3. Add a description of your changes
4. Click **Publish** to deploy
1. Click **Publish** in the top right corner
2. Choose a version type (Major, Minor, or Patch)
3. Add a description of your changes
4. Click **Publish** to deploy
 * **Drafts:** Changes are auto-saved as drafts until you publish
* **Version history:** Access previous versions from the dropdown menu
* **Rollback:** Revert to any previous version if needed
***
## Best practices
* **Drafts:** Changes are auto-saved as drafts until you publish
* **Version history:** Access previous versions from the dropdown menu
* **Rollback:** Revert to any previous version if needed
***
## Best practices